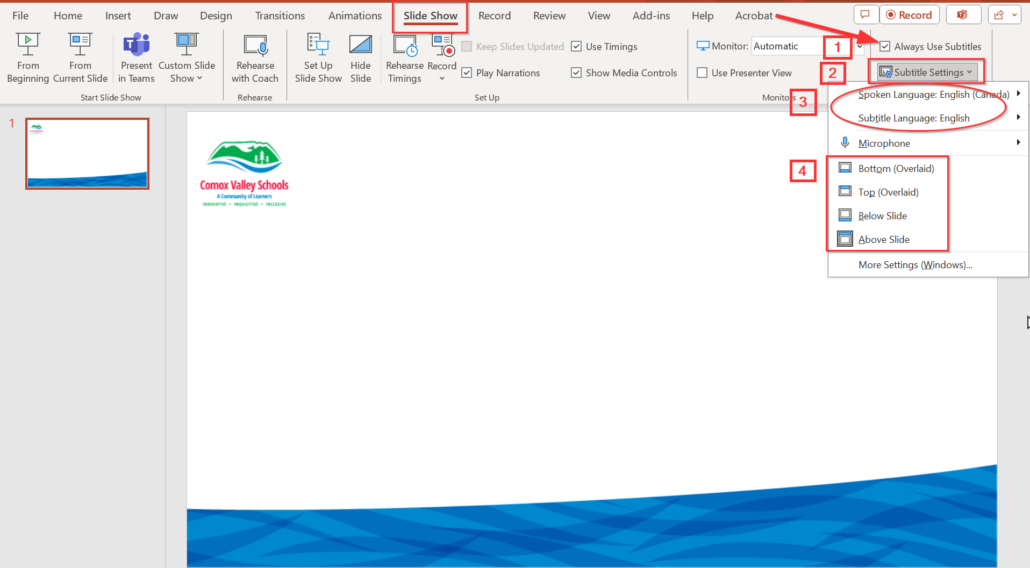
I can’t believe that tomorrow is May 1st, it seems like time is flying by! Speaking of being in a hurry-I bet you have had to text someone with one hand while your other arm is full of work or groceries… Did you know that you can slide the keyboard on your phone to the left or the right to make it easier to text with one hand? Read on for instructions for this. I am also excited to share that our Ministry of Education has produced some guidelines for using AI. in schools. We have posted them all on Learn71 here. Click here to go our page with the Ministry of Education AI Guidelines
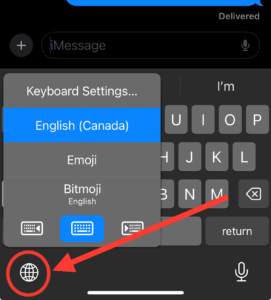
One Handed Typing Mode on an iPhone:
1. Use an app that makes the keyboard pop up.
2. Press and hold your finger down on the globe at the bottom left of your screen
3. Choose which side of the screen you would like the keyboard to slide over to.
One Handed Typing on Android Phone:
With an android phone you can shrink the screen and have it go to bottom left or right to make it easier to navigate with one hand. Click here for instructions for one handed mode for android phones.
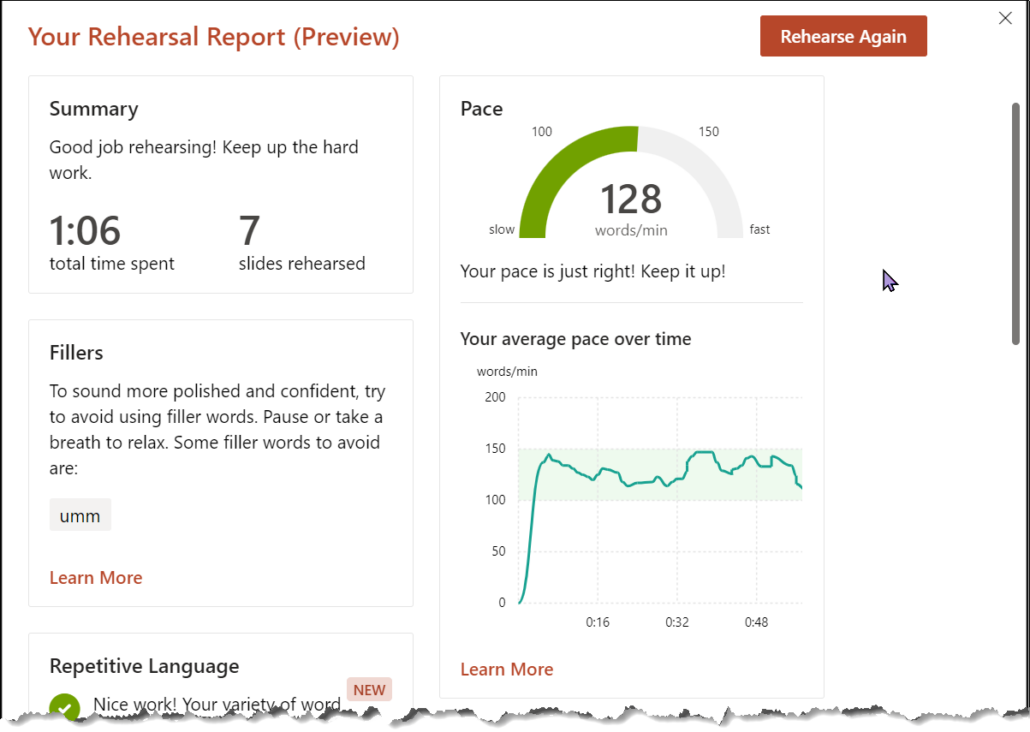
I am doing a presentation at a conference on Friday and like my normal self, I am totally nervous and want to do well. To practice the presentation, I tried out Microsoft’s Speaker Coach in PowerPoint and now I want to share how awesome it is with all of you! I was able to figure out how long my presentation was (too long), how many times I said umm (lots), if my pace sped up and slowed down (yep) and a whole bunch more information about how I present! This is a valuable tool for me, for teachers and for all our students who use PowerPoint. This reminds me, I can also turn on Closed Captioning in PowerPoint when I present and we missed a link in our Tech Tip last week: Captions and Soundfield in the Classroom – Learn71
How to use Speaker Coach:
1. Open your PowerPoint presentation online (it must be the online version)
2. Click on the arrow beside Present at the top right and then click on Rehearse with Coach

3. When you are ready to start, click on Start Rehearsing.

If you leave Show Real-time feedback checked, as you are speaking it encourages you and lets you know what you make mistakes (like saying umm over and over).
4. When you finish presenting, press end or escape to get out of presenter view and you will see your results. Make sure you scroll down to see them all! There are a whole bunch of new areas of data you can see like if words were repeated, pronounced correctly and if your language was inclusive.
I keep getting all these great Earth Day ideas sent to me and instead of letting them live in my email collection, I would like to share them with you! Common Sense Education has collected some great sites with videos and activities and of course, I can’t help but share the awesome Minecraft worlds that are designed to help students visualize problems our Earth is facing and to design solutions. Hopefully, some of these ideas will inspire you for Earth Day on the 22nd.
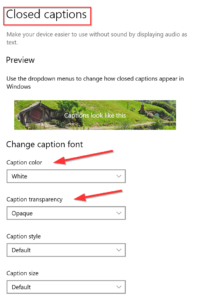
Jane Rondow and Shannon Hagen have also added a great page of instructions for using PowerPoint in your classroom with Closed Captions to help students catch all your important words.
Earth Day Ideas:
- From Common Sense:
- Earth Day and the Environment: Check out this article for lessons, texts, activities, and videos for all grades about climate change and the environment, including resources like the Climate Mental Health Network.
-
Make an impact this Earth Day with Minecraft Education It’s almost Earth Day! Show your students they have the power to change the world with Minecraft lesson collections focused on creating a more sustainable planet: 
(NEW) Planet Earth III: Explore the way animals’ lives are intertwined by playing as predator and prey, parent and offspring, friend and ally. (Also check out Planet Earth I and II-they are beautiful! Sustainability City: Investigate real-life sustainable processes—sustainable home components, managing waste, generating electricity, responsible forestry, and more. Climate Futures: Aligned to the UN Sustainable Development Goals, this lesson educates youth about climate change and how they can have a positive impact. Explore resources >
PowerPoint Captioning