
Welcome back everyone. I hope you all had a restful and fun holiday 🙂 I came back to some exciting news from Microsoft: Math Progress is now released globally so we all have access! I was super excited when Reading Progress came out, a great program to help people improve their reading, and now Math Progress is available in Teams Assignments to help students ages 9-18 improve their Math skills. Math Progress will generate Math questions (or you are welcome to create your own), auto-grade them, track student progress and help you identify focus areas for more support and when you send the results back to the students, they can open them to see the steps that they should have done to complete the question (oh yeah, the computer does that for you). Can you tell my excitement by my run on sentences? This is a great tool that you can use to create homework, quizzes and tests. Did I mention that students can even submit the written work that they do to support their answers?
Here is a short (ish) video explaining how it works:
We are excited to share that Book Creator has had some amazing new upgrades. It is now equipped with Background Remover, a tool we use all the time in Canva. Read on to learn about their recent improvements. Next week is National Coding Week—a fantastic chance to enhance problem-solving skills while introducing students to coding, a valuable skill that could shape their future careers. Why not start with an Hour of Code? We have outlined some of favourites below (the Minecraft Hour of code is a fantastic way to introduce the School District Minecraft Challenge-hint hint 😉).
Book Creator Update:
- Zoom Magic 🧐 – Published books now come with zooming capabilities in read mode! Readers can easily zoom in and out to catch every detail.
- Image Editing with the Pen Tool 🖌️ – You can now edit images right on your pages, using the pen tool to add your own personal touch to visuals!
- Transparency Slider 🌫️ – Adjust the transparency of text, images, and more to create custom looks that suit your style!
- Background Remover ✂️ – This might be my favorite update! Now you can remove backgrounds from images in a snap. Just imagine placing a cat on a tropical beach or a selfie with a concert backdrop!
We all have such busy lives, it can be super hard to find time to schedule a meeting with a coworker. To help make this easier, Microsoft has built Scheduling Poll (used to be called Find Time) right into Outlook email. Instead of endlessly writing back and forth to get a perfect time, try this easy solution. Thank you, Sandra, for suggesting this Tech Tip 😊 Please read on for how to use Scheduling Poll and some Ministry of Education AI Lessons for your classes!
How to use Scheduling Poll:
- Open a New Email: Start by creating a new email to send to your group. You need to have the names in the “To:” section for this to work.
- Insert the Scheduling Poll: Click on the “Message” tab, then click in the body of your email and choose Scheduling Poll at the top.
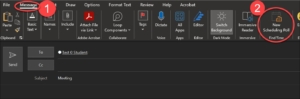
- The Scheduling Poll appears on the right side of your screen.
- Select Meeting Times: Select the duration of the meeting and the date of the meeting then choose meeting times. If your coworkers use the Outlook Calendar, it will show if they are busy or not. You can change the date and select options on different days. Choose several options that you think will work for everyone.
- Click Next: Then you can enter the location or leave it as a Teams meeting.
- Click Create Poll: It will add a graphic to your email.
- Send the Poll: Send the email. The recipients will get a link to the poll where they can vote on the times they’re available.
- Check the Results: You’ll be notified as people respond, and you can view the results to easily see which time works best for the majority.
- ADST 3-5 Teaching and Learning Story – What is AI, How can we use it and What should we look out for (PDF, 501KB)
- ADST 8 Teaching and Learning Story – What is AI and the Ethical Use of AI (PDF, 1.6MB)
- ADST 12 Teaching and Learning Story – Digital Email Marketing with AI Content (PDF, 764KB)
- Anatomy and Physiology 12 Teaching and Learning Story – Heart Diagram (PDF, 391KB)
- Arts Education 10-12 Teaching and Learning Story – Redesign for Reconciliation (PDF, 1.2MB)
- Arts Education and ELA 10-12 Teaching and Learning Story – Integrating AI Into the Arts (PDF, 1.3MB)
- BCFP 12 Teaching and Learning Story – Ethics of Generating AI Images of BC First Peoples and Local Indigenous Art (PDF, 857KB)
- ELA 9 Teaching and Learning Story – AI Stories – The good, the bad, and the hallucination (PDF, 346KB)
- Math 9 Teaching and Learning Story – Exploring AI and Dodging Bias (PDF, 395KB)
- Media Design 10 Teaching and Learning Story – Discerning Bias in AI Text Generated Images (PDF, 1.44MB)
- Science 3-4 Teaching and Learning Story – Exploring The Motions of the Earth, Moon and Sun (PDF, 680KB)
- Social Studies 4-5 Teaching and Learning Story – Can AI Help us Write Land Acknowledgments (PDF, 550KB)
- Web Development 10 Teaching and Learning Story – Website Development Unit Accelerated with AI Content (PDF, 967KB)
- More Teaching and Learning Stories are coming soon