Tech Tips
  • Home
  • Learn More
  • Menu Menu
Tech Tips

Reading Coach, AI Assignments and Rubrics in Teams and more Unbeatable Microsoft Updates

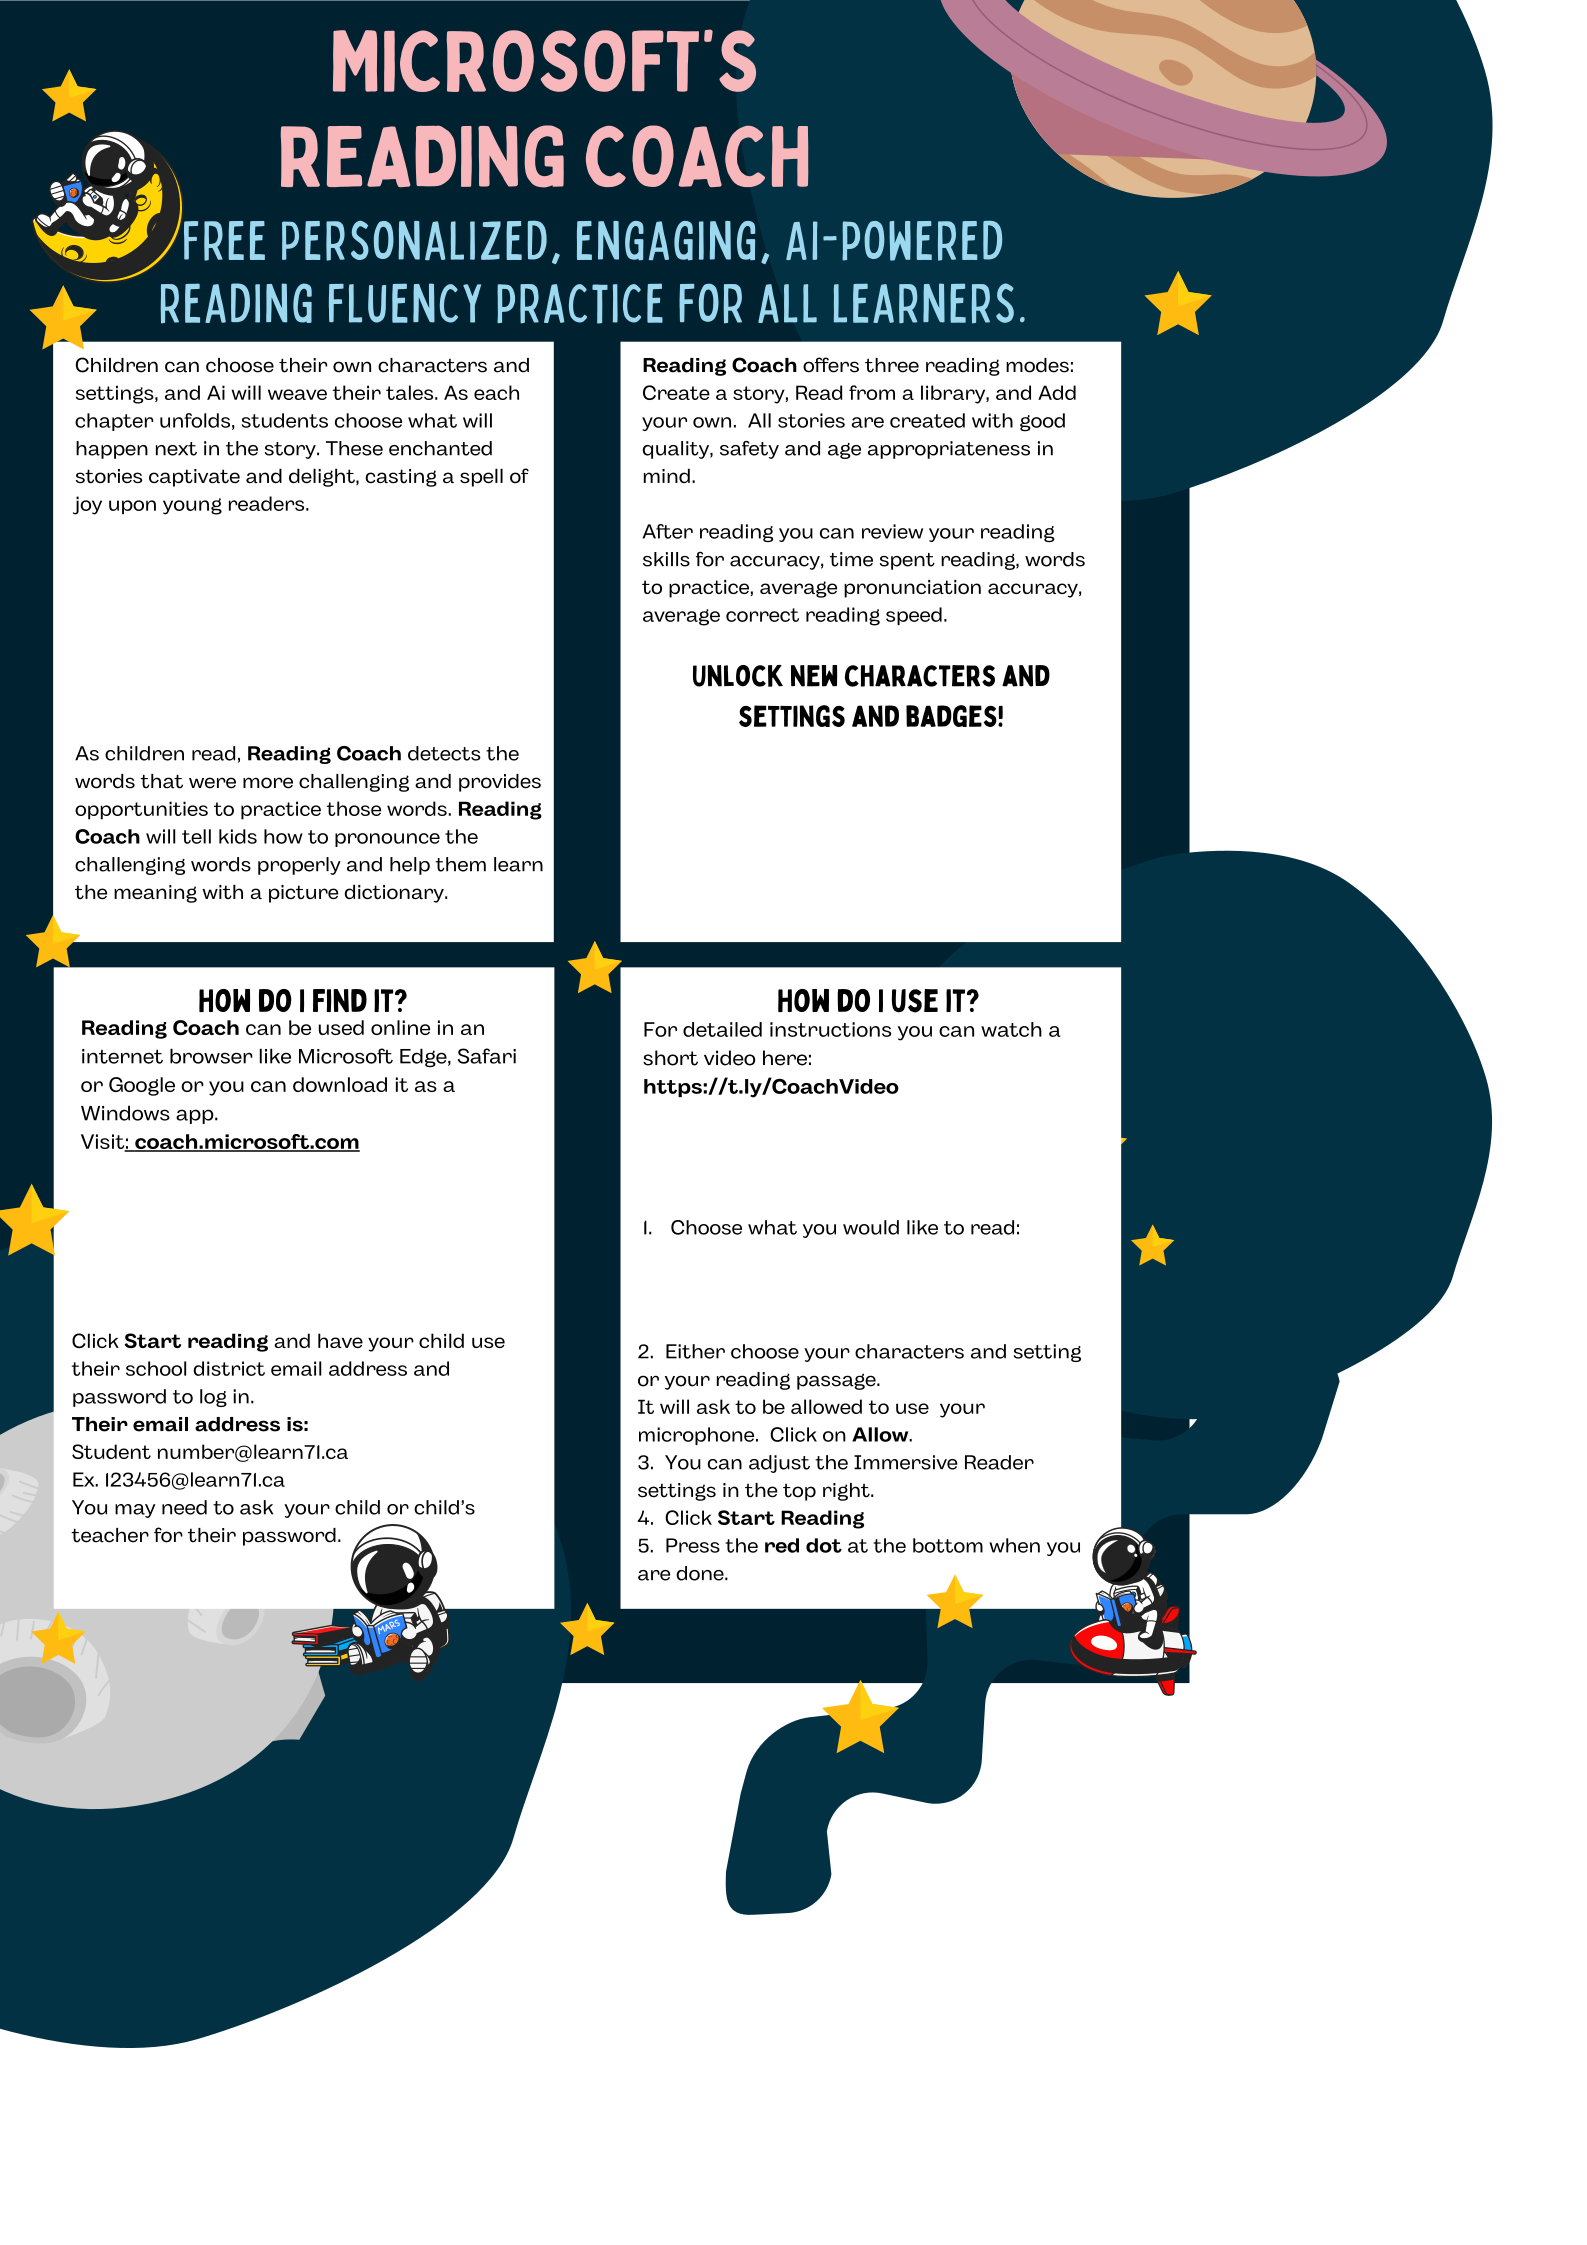
I am super excited this week to share the new Microsoft updates with you!  Those of you using Reading Progress should see AI Generated Passages as one of your reading passage options and the program will keep track of the words students are struggling with and will add those words to new reading passages (I know, this is so cool!). Teams Assignments now have AI generated assignment descriptions! You choose your topic and let it run, add sparkle, more details, step by step instructions and then have it make a rubric for you! (Sorry about the exclamation marks-I’m really excited about these!) Reading Coach has also been released. This is a low maintenance, stand-alone reading accelerator that students can use at school and at home on their own! Please watch the short video below for more details and share the Reading Coach poster with parents.

Click here to read the new Microsoft Updates in May.

Here is a video about the Teams Updates-they are awesome!​

…and Reading Coach

July 9, 2026/by admin
https://learn71.ca/tech-tips/wp-content/uploads/sites/42/2026/07/Tech-Tips-Logo.png 0 0 admin https://learn71.ca/tech-tips/wp-content/uploads/sites/42/2026/07/Tech-Tips-Logo.png admin2026-07-09 10:26:332026-07-09 10:26:33Reading Coach, AI Assignments and Rubrics in Teams and more Unbeatable Microsoft Updates
Tech Tips

Printing from District iPads

Exciting news . . . . printing can now be done from district iPads at school.  Each school is assigned one printer for the iPads to print to (usually the library printer).  Printing can be done from any app on the iPad although the process may be different for each one.  Thank you Shannon for writing this tech tip and Jane, Shannon, John and Shaun for all of their work making this happen!

Printing from an iPad at School​

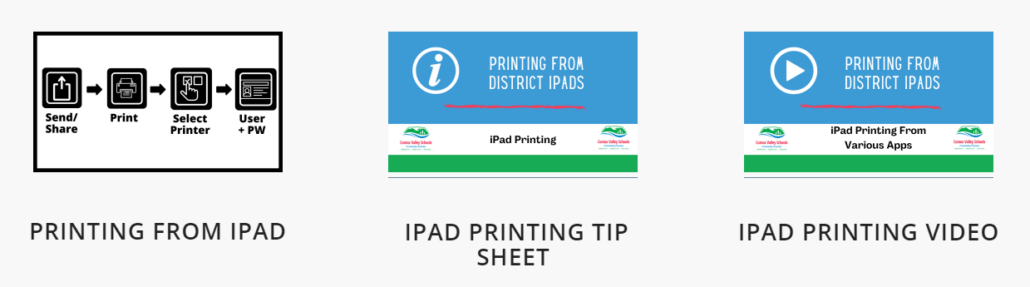
Below is the link to the webpage that houses the set of instructions, both printed and in video form.  Click on the image to access it.  The video demonstrates how to print from a variety of apps on the iPad.

The Printing Process:​

1. Open app to print from.  

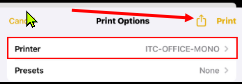
2. Click on the Share icon.

3. Select the Print option.

4. Select the printer (only one option listed).

5. Print.

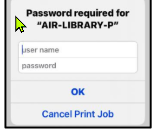
6. Sign in using the SD71 username and login (same as for logging into the computers).  OK.

(Note: the process is slightly different for the Office products (Word, PowerPoint).  The instructions for this are located at 1:25 in the video.)

The Inclusive Ed iPads (#35s) have all the printers listed.  The specific school printer will need to be chosen to print at that location.

July 9, 2026/by admin
https://learn71.ca/tech-tips/wp-content/uploads/sites/42/2026/07/Tech-Tips-Logo.png 0 0 admin https://learn71.ca/tech-tips/wp-content/uploads/sites/42/2026/07/Tech-Tips-Logo.png admin2026-07-09 10:12:142026-07-09 10:12:14Printing from District iPads
Tech Tips

AI Guidelines and One Handed Keyboard on Your Phone

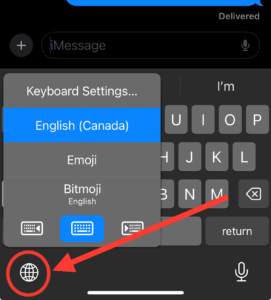
​​​I can’t believe that tomorrow is May 1st, it seems like time is flying by!  Speaking of being in a hurry-I bet you have had to text someone with one hand while your other arm is full of work or groceries… Did you know that you can slide the keyboard on your phone to the left or the right to make it easier to text with one hand? Read on for instructions for this. I am also excited to share that our Ministry of Education has produced some guidelines for using AI. in schools.  We have posted them all on Learn71 here. Click here to go our page with the Ministry of Education AI Guidelines

One Handed Typing Mode on an iPhone:

1.  Use an app that makes the keyboard pop up.

2.  Press and hold your finger down on the globe at the bottom left of your screen

3.  Choose which side of the screen you would like the keyboard to slide over to.

One Handed Typing on Android Phone:

​​With an android phone you can shrink the screen and have it go to bottom left or right to make it easier to navigate with one hand. Click here for instructions for one handed mode for android phones.​

July 9, 2026/by admin
https://learn71.ca/tech-tips/wp-content/uploads/sites/42/2026/07/Tech-Tips-Logo.png 0 0 admin https://learn71.ca/tech-tips/wp-content/uploads/sites/42/2026/07/Tech-Tips-Logo.png admin2026-07-09 10:09:362026-07-09 10:09:36AI Guidelines and One Handed Keyboard on Your Phone
Tech Tips

Ace your Presentations with Speaker Coach

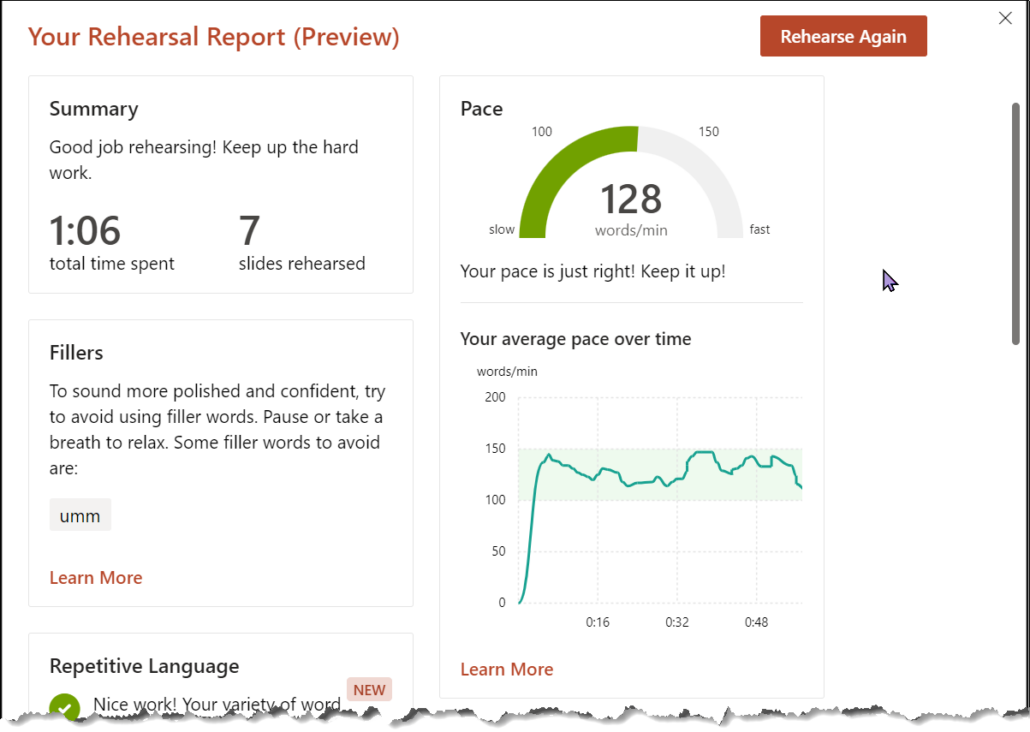
​​I am doing a presentation at a conference on Friday and like my normal self, I am totally nervous and want to do well.  To practice the presentation, I tried out Microsoft’s Speaker Coach in PowerPoint and now I want to share how awesome it is with all of you! I was able to figure out how long my presentation was (too long), how many times I said umm (lots), if my pace sped up and slowed down (yep) and a whole bunch more information about how I present!  This is a valuable tool for me, for teachers and for all our students who use PowerPoint.  This reminds me, I can also turn on Closed Captioning in PowerPoint when I present and we missed a link in our Tech Tip last week: Captions and Soundfield in the Classroom – Learn71​

How to use Speaker Coach:

1.  Open your PowerPoint presentation online (it must be the online version)

2.  Click on the arrow beside Present at the top right and then click on Rehearse with Coach

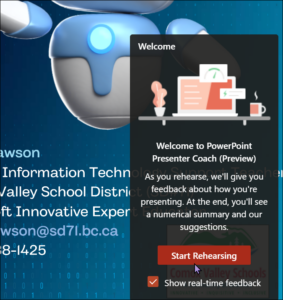
3. When you are ready to start, click on Start Rehearsing.

If you leave Show Real-time feedback checked, as you are speaking it encourages you and lets you know what you make mistakes (like saying umm​ over and over).

4.  When you finish presenting, press end or escape to get out of presenter view and you will see your results.  Make sure you scroll down to see them all! There are a whole bunch of new areas of data you can see like if words were repeated, pronounced correctly and if your language was inclusive.

To learn more about Speaker Coach, click here.

July 9, 2026/by admin
https://learn71.ca/tech-tips/wp-content/uploads/sites/42/2026/07/Tech-Tips-Logo.png 0 0 admin https://learn71.ca/tech-tips/wp-content/uploads/sites/42/2026/07/Tech-Tips-Logo.png admin2026-07-09 10:08:422026-07-09 10:08:42Ace your Presentations with Speaker Coach
Tech Tips

Earth Day Ideas and Closed Captions for PowerPoint

​I keep getting all these great Earth Day ideas sent to me and instead of letting them live in my email collection, I would like to share them with you!  Common Sense​ Education has collected some great sites with videos and activities and of course, I can’t help but share the awesome Minecraft worlds that are designed to help students visualize problems our Earth is facing and to design solutions.  Hopefully, some of these ideas will inspire you for Earth Day on the 22nd.  

Jane Rondow and Shannon Hagen have also added a great page of instructions for using PowerPoint in your classroom with Closed Captions to help students catch all your important words. ​​

Earth Day Ideas:

  • From Common Sense:
    • Earth Day and the Environment: Check out this article for lessons, texts, activities, and videos for all grades about climate change and the environment, including resources like the Climate Mental Health Network.
  • Make an impact this Earth Day with Minecraft Education
    It’s almost Earth Day! Show your students they have the power to change the world with Minecraft lesson collections focused on creating a more sustainable planet:
    Graphic image of animals standing in an elevated area with mountains on the background with light and dark blue frames around it
    (NEW) Planet Earth III: Explore the way animals’ lives are intertwined by playing as predator and prey, parent and offspring, friend and ally. (Also check out Planet Earth I and II-they are beautiful!
    Sustainability City: Investigate real-life sustainable processes—sustainable home components, managing waste, generating electricity, responsible forestry, and more.
    Climate Futures: Aligned to the UN Sustainable Development Goals, this lesson educates youth about climate change and how they can have a positive impact.
    Explore resources >

PowerPoint Captioning

PowerPoint has built-in tools to increase the accessibility of presentations using their built-in captioning and translation functions, which can easily be set as default functions.
The Caption function allows you to have captions in one language. Presenting live will enable participants to choose the language of captions.​​
Follow the steps below to enable captioning for your next presentation:
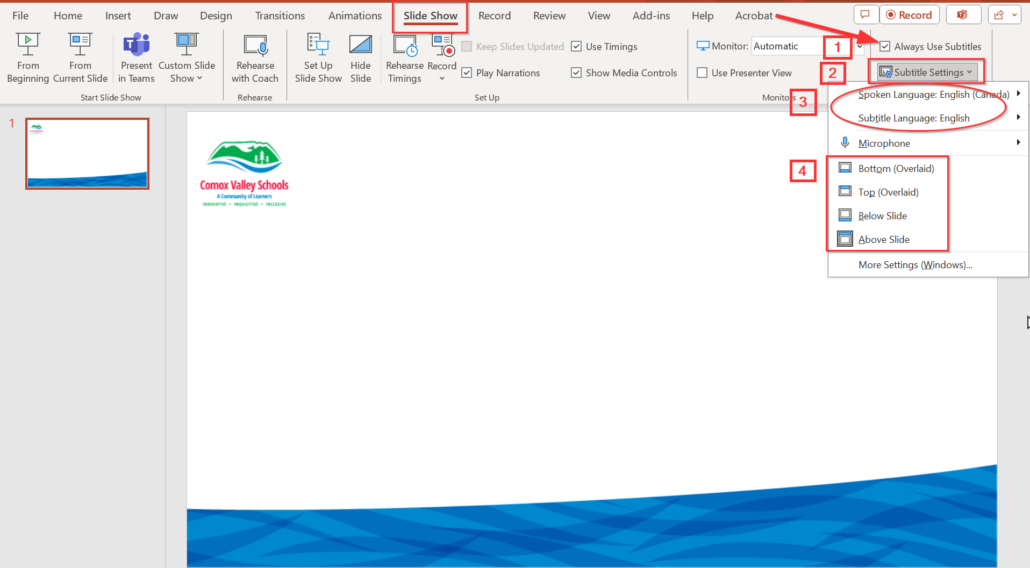
1.  Click on the “Slide Show” tab in the PowerPoint ribbon.
2.  Check the box “Always Use Subtitles”.  This is found in the “Captions & Subtitles” section.
3.  Choose the language both for what is spoken AND what is displayed.  ***It is English by default.
4.  Determine where you’d like the captions to be displayed.
Note: If you are choosing “Overlaid,” be sure the background of your slides offers enough colour contrast to the color of the captions.

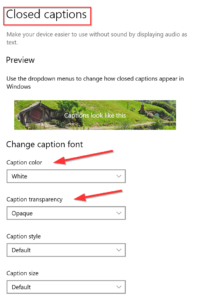
You can use the “More Settings” link to format captions even further (font colour, font type, background transparency, etc.)…
 
***NOTE:  The “Present Live” option can be used if you would like to have the captions translated into different languages for the audience.

Click on the link below to learn more about Closed Captioning, Presenting “Live” and how to best deliver instructional resources to our hard of hearing students.​​
 

​Captioning and Soundfields in the Classroom

July 9, 2026/by admin
https://learn71.ca/tech-tips/wp-content/uploads/sites/42/2026/07/Tech-Tips-Logo.png 0 0 admin https://learn71.ca/tech-tips/wp-content/uploads/sites/42/2026/07/Tech-Tips-Logo.png admin2026-07-09 10:07:012026-07-09 10:07:01Earth Day Ideas and Closed Captions for PowerPoint
Tech Tips

Creating a QR Code in the Web Address Bar (Edge)

Happy Tuesday! This week’s Tech Tip, by Shannon Hagen, zooms in on the power of QR codes—those square-shaped barcodes that you can quickly scan with your phone or iPad to get to a website or open digital content.  As this year’s Code Quest Arcade gets closer, we are asking anyone who would like to have their class share their coding projects to please take a moment to open this link (Arcade Presenter Form) and fill out a quick form by May 3rd. It’s just to help us know how many computers we need for the event.

QR codes are being used more and more as people figure out how to use them effectively.  They allow users to quickly access information from a web browser just by scanning the QR code with a mobile device.  In the past, we would have to use a separate app or program to create these codes.  Now however, it is built right into the Edge browser.​​  

(It can be done in Chrome but with a couple of extra steps)

Follow the directions below to do this:

1.  Open the Edge browser.  The icon looks like this:

2. Type in the website address you would like to create a QR code from in the address bar.  Press Enter to go to the site.  (You won’t see the QR code icon yet).

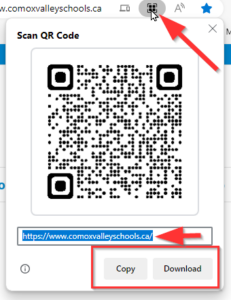
3.  Click on the address bar right next to the website address.  You now see a few icons being displayed on the far right.  

4.  Click on the QR code icon (see image above).  This will open up another window which will allow you to Copy or Download the QR code.
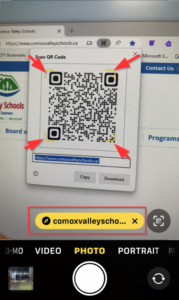
5.  The user just has to open the camera app on the mobile device and frame the QR code in the yellow brackets displayed on the screen.  The link will be displayed at the bottom of the screen.  Tap on this to open the website.
Use the directions listed below for creating Shareable Links from QR codes.

👆Creating Sharable Links from QR Codes ​

​

For Google Chrome:

Open the Chrome Browser.  Enter in website address.  Press Enter to go to site.

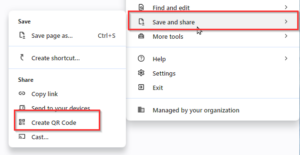
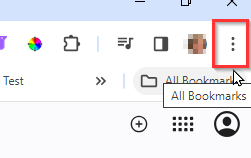
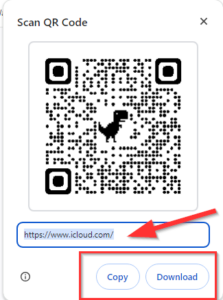
Click on “…” (ellipses) on the far right of the address bar at the top.  Select “Save and share” -> “Create QR code.”
Clicking on it will open another window to “Copy or Download”.
July 9, 2026/by admin
https://learn71.ca/tech-tips/wp-content/uploads/sites/42/2026/07/Tech-Tips-Logo.png 0 0 admin https://learn71.ca/tech-tips/wp-content/uploads/sites/42/2026/07/Tech-Tips-Logo.png admin2026-07-09 10:04:592026-07-09 10:04:59Creating a QR Code in the Web Address Bar (Edge)
Tech Tips

Converting a PDF into an Excel Document

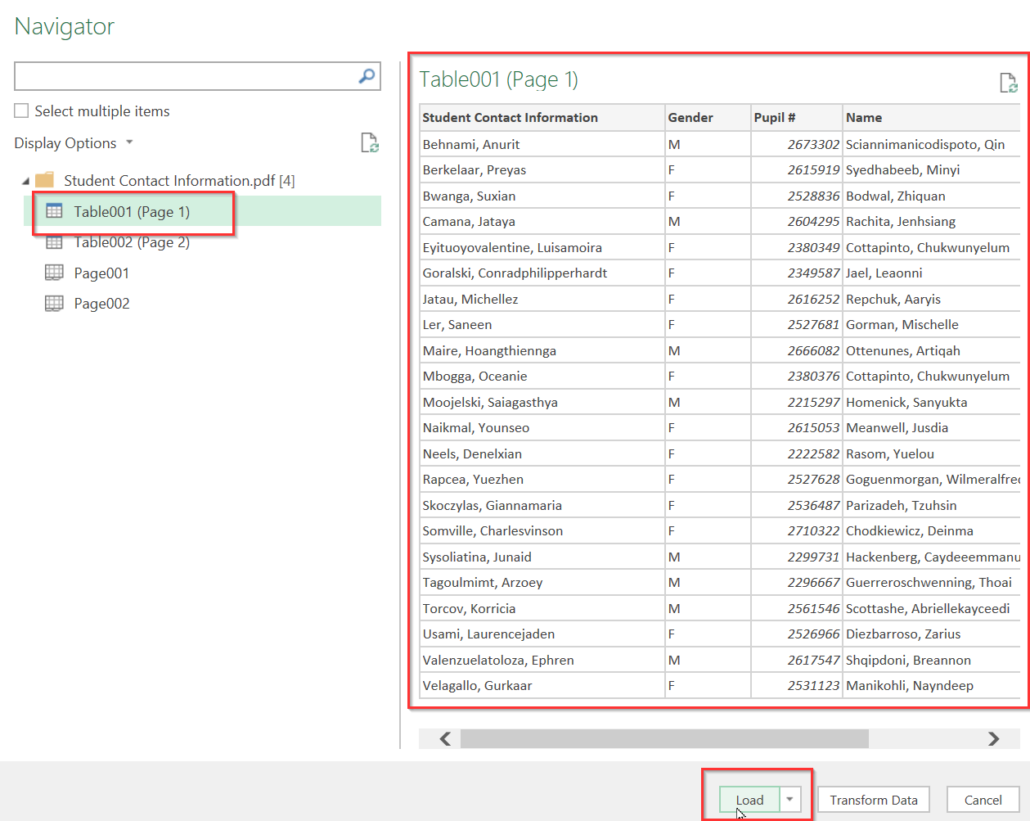
​​Hope everyone had a fun and relaxing Spring Break.  Have you ever had a PDF that consisted of a table with a list that you wanted to be able to edit?  If it was a Word document, you could open it in Word, and it would convert it.  Unfortunately, it doesn’t work that way in Excel.  However, you can insert a pdf once you’re inside Excel, which will then convert the contents into a table.  

This would be useful if you had a list of contacts or a schedule that was in a pdf format, but you wanted to be able to edit it.

Follow the directions below to do this:

1.  Open Excel

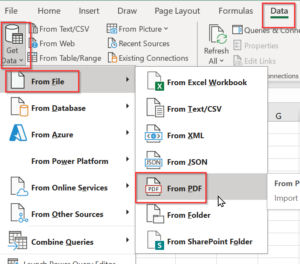
2. Go to “Data” top tab -> “Get Data” from the ribbon -> From File -> From PDF

3.  Locate the PDF from your computer -> Import.

4.  Select “Table” -> “Load”  (NOT transform data). 

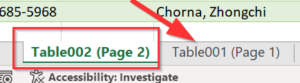
If there are two tables in the pdf (as in the image above), this process will need to be repeated. The second table will be added as a separate spreadsheet and can be accessed by clicking on the tab at the bottom of the excel document.  

If you would like all the data in one spreadsheet (one table) just copy and paste the data from one spreadsheet to the other.

The data will be imported AND automatically converted to a table.  This will allow you to use the drop-down arrows at the top of each column to manipulate your data easily.

July 9, 2026/by admin
https://learn71.ca/tech-tips/wp-content/uploads/sites/42/2026/07/Tech-Tips-Logo.png 0 0 admin https://learn71.ca/tech-tips/wp-content/uploads/sites/42/2026/07/Tech-Tips-Logo.png admin2026-07-09 10:02:242026-07-09 10:02:24Converting a PDF into an Excel Document
Tech Tips

Happy Spring Break-A Couple Techie Easter Eggs and Help with Reply All

Spring Break is just about here, and we just can’t resist sharing a couple of​ techie online Easter Eggs with you.  Tech Easter eggs are undocumented hidden messages or features that the developers have hidden in software.  But first, a little reminder about using “Reply all” in your emails. Before hitting “Reply All” on an email, please ask yourself: “Does everyone on this list need to see my response?”  I know it is an embarrassing mistake that I have made before. If you hit “Reply all” as your email reply, you may accidentally have it set as your default. Read below for a couple of fun Easter Eggs and some instructions to make sure that “Reply All” is not your default for email replies.

Easter Eggs:

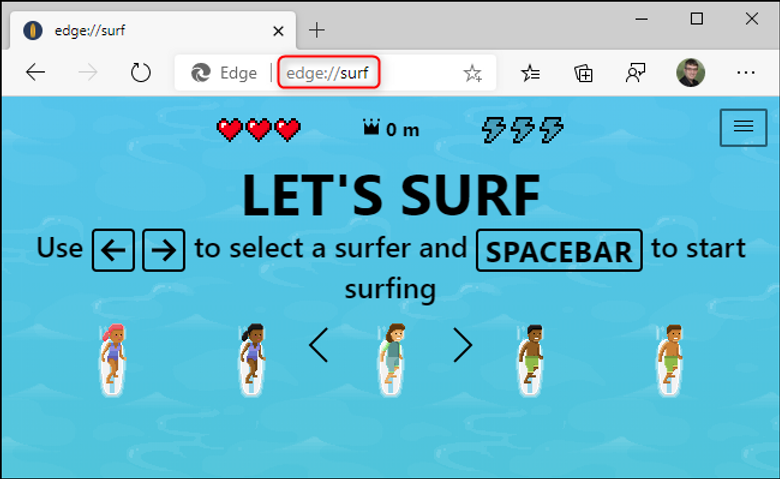
1.  In The Edge Browser (yes, we might be promoting this one a bit) type in e​dge://surf at the top where you type in URLs. You will get a fun surfing game!  Before the game starts, type in Microsoft and you will get unlimited lives.

2.  I suppose I shouldn’t leave out  Google Chrome. If you type in chrome://dino you will get that fun dino game the kids always play when the internet is down.​ You do have to be in Google Chrome for it to work.

3.  ​The hidden emoji game in Instagram – my daughter told me about this one.  Use Direct Message (dm) to send someone an emoji. They can then press on it to open a pong game.​​

If you like these, click here to see the Easter Eggs I shared last spring​.

How to Make Sure Reply All is not your Default

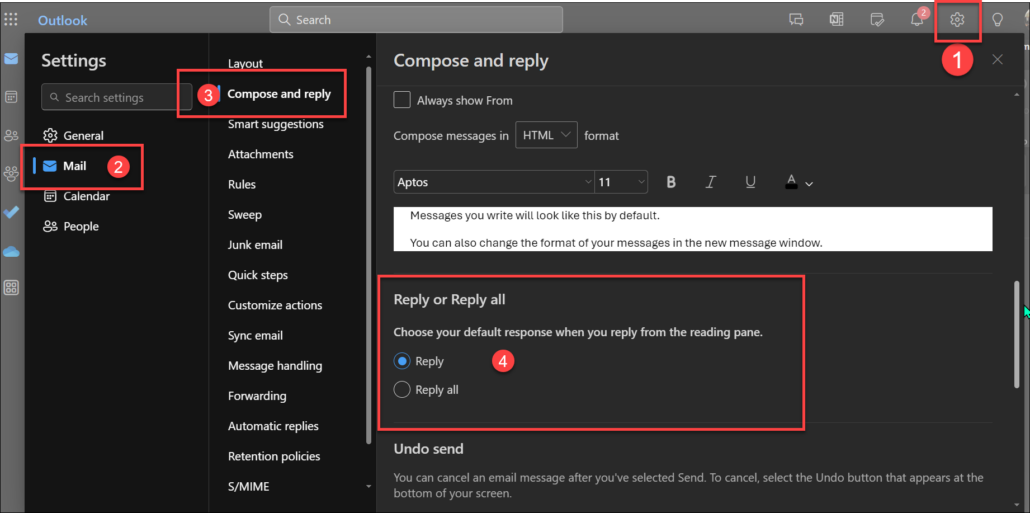
For your online email, open your Outlook email

1.  Click on the Settings Wheel in the top right

2.  Click on Mail

3.  Click on Compose and reply

4.  Click on the circle that has “Reply” under Reply or Reply all​

The Outlook App on a Cell Phone:
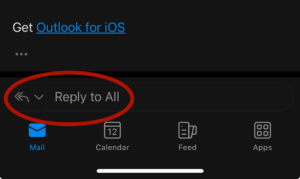
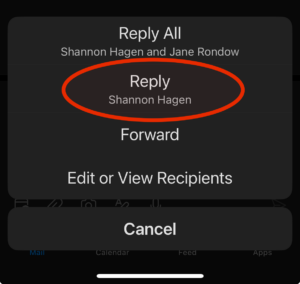
If you are using the Outlook app on an iphone, the default is “Reply all” when the email was sent to more than one person.  You have to make sure that you press on the arrow beside the  “Reply All” button and hold it down until you see the Reply option.
July 9, 2026/by admin
https://learn71.ca/tech-tips/wp-content/uploads/sites/42/2026/07/Tech-Tips-Logo.png 0 0 admin https://learn71.ca/tech-tips/wp-content/uploads/sites/42/2026/07/Tech-Tips-Logo.png admin2026-07-09 10:00:412026-07-09 10:00:41Happy Spring Break-A Couple Techie Easter Eggs and Help with Reply All
Tech Tips

A Fun History Game and How to Change the Size and Colour of Your Mouse Cursor

Today I can’t resist sharing the history game I found.  History buffs and history teachers will love timeguessr.com where you are given a picture, and you try to guess the location and year it was taken.

Jane Rondow, our wonderful SD 71 District Inclusion Teacher (Assistive Technology), has written this week’s text tip on how to change your cursor and the size of your mouse pointer. ​

Are you using your computer to present, show people how to do things, point out things on websites, do an online meeting or make a how-to video? Draw attention to the things you are showing by enlarging your mouse cursor.  This can also be helpful for people with visual Impairments, processing needs or anyone really.

Windows Computer :

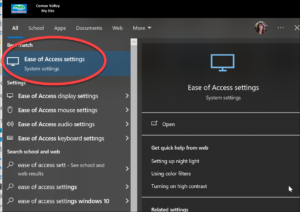
1. Tap the Windows key ​  

2. Type “Ease of Access Settings” select this menu option.   

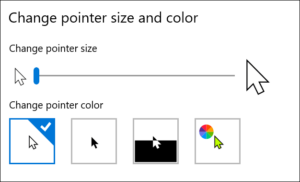
3. Select Mouse Pointer from the menu on the left.

4. Slide the change pointer size slider to the right to make it bigger, to the left to make it smaller. 

5. Select the pointer colour and contrast    

6. If you select the far-right colourful option, you can choose any colour, + Pick a custom pointer colour 

*Selecting a High Contrast option like yellow (with a black outline) or black makes the cursor easier for people with low vision needs to see the cursor. Doing small circles with the cursor around or near the area you would like people to focus on helps to gain attention to that area.  

LINK  Windows Make your Mouse, Keyboard or Other Input Devices Easier to Use 

LINK Mac Computer Make the Pointer Easier to see on a Mac 


July 9, 2026/by admin
https://learn71.ca/tech-tips/wp-content/uploads/sites/42/2026/07/Tech-Tips-Logo.png 0 0 admin https://learn71.ca/tech-tips/wp-content/uploads/sites/42/2026/07/Tech-Tips-Logo.png admin2026-07-09 09:58:122026-07-09 09:58:12A Fun History Game and How to Change the Size and Colour of Your Mouse Cursor
Tech Tips

Keeping Track- How to use Tasks as a To-Do List in Outlook

Happy password changing day. ​For this Tuesday’s tech tip, let’s dive into using Outlook Tasks to help​ you keep track of your to-do list. Outlook Tasks is a powerful tool that lets you to organize your to-do lists, set deadlines, and prioritize daily tasks efficiently. ​ This simple organization trick can significantly enhance your productivity and ensure nothing slips through the cracks. I personally am going to try using this instead of my paper to do list which I have all over the place!

Here is a short video that explains it super well

…and you can click here for more instructions for using Tasks.

July 9, 2026/by admin
https://learn71.ca/tech-tips/wp-content/uploads/sites/42/2026/07/Tech-Tips-Logo.png 0 0 admin https://learn71.ca/tech-tips/wp-content/uploads/sites/42/2026/07/Tech-Tips-Logo.png admin2026-07-09 09:56:272026-07-09 09:56:27Keeping Track- How to use Tasks as a To-Do List in Outlook
Page 3 of 7‹12345›»

Archive

  • July 2026
  • August 2024

Categories

  • Tech Tips

Facebook

Instagram

No images available at the moment

Follow Me!

Footer

Footer 2

Scroll to top Scroll to top Scroll to top