
We are super excited that we now have access to Pebble Go and Pebble Go Next. We have purchased four modules for grades K-2: Animals, Science, Social Studies, Health and for Pebble Go Next (Grades 3-5) we have the Science module. Pebble Go is an online resource designed for young students, offering age-appropriate content on various subjects. It features easy-to-read articles, videos, and interactive activities to engage early learners and promote independent research skills. Typing Pal also has a new game this year and some exciting new offerings to make typing more engaging for our students. Please read on to learn how to access Pebble Go and learn about the updates to Typing Pal.
I am super excited to share that Reading Progress now allows you to add comprehension questions that will self-mark to go with the reading passages that you choose. At this point you must make the questions yourself, but this could change in the future. Reading Progress is an excellent tool to use to help your students practice their reading skills and reading with fluency. It gives you a wide range of data about your students reading: mispronunciations, repetitions, omissions, self-corrections, insertions, if they pronounced periods, exclamations, question marks, paused, rushed, or read in a monotone voice. Of course, it is never as accurate as a teacher, but you can listen to the recordings and change any of the computer results. Read on for more about Reading Progress and to learn more about some exciting workshops that are being offered by Arc-BC (an online repository supported by the Ministry of Education to provide BC K-12 students with perceptual disabilities with BC curricular-based learning materials in digital alternate formats).
Reading Progress with Comprehension Questions:
I have also created some written instructions to help you get started:
Click here for some instructions for how to set up Reading Progress
This and more information about Reading Progress can be found on Learn71.ca here: https://youtu.be/3Bjg0gXWe8Y?si=ZgIwYs4bu8By_Tpe
I would love to come and help you with this in your classroom so please email me if you would like some support 🙂
I sure wish I knew this Tech Tip before the Code Quest Arcade last month when our students were frantically searching for images with no background that they could use for their characters in their games. I used to tell people to add “transparent background” in the Google search when they wanted this but I just learned a super easy fast way to search for images with a transparent background.
Here’s how:
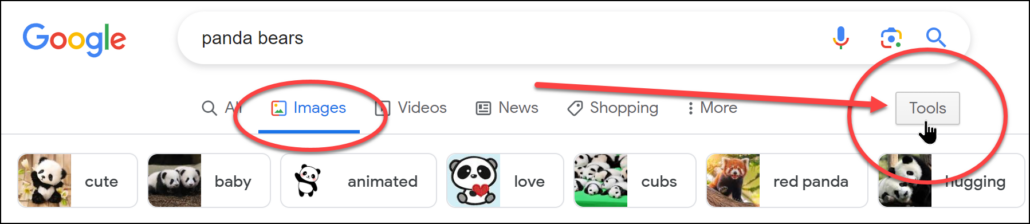
1. Open Google and click on Images, then type what you are looking for in the Search.
2. Click on Tools on the top right of the search:
3. Click on Colour and select Transparent:
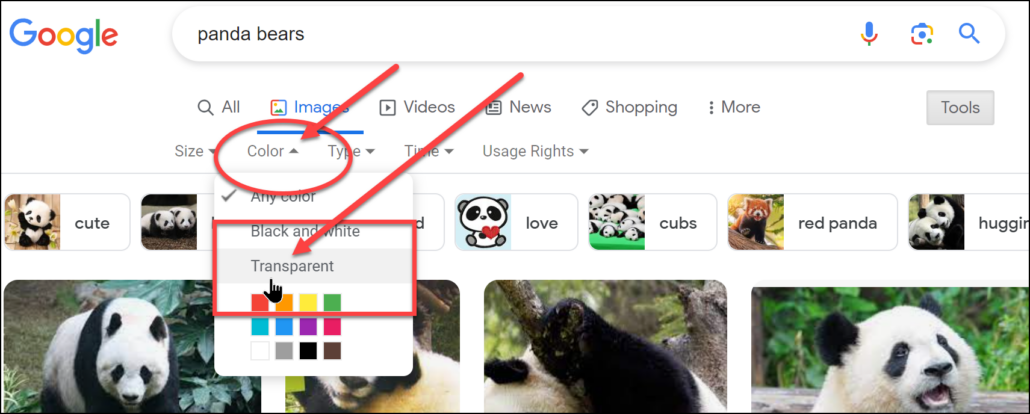
Now the pictures that they find should have a transparent background.
4. This is a super great opportunity to teach your students about Usage Rights as well. Have them click on Usage Rights and select Creative Common Licenses:
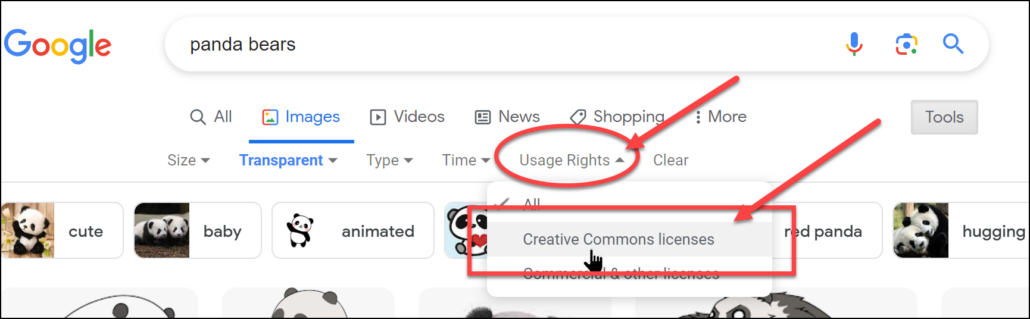
Pictures that students find under the Creative Commons License are free for public use. While we should always give the artist credit for the pictures, it is not always necessary if you are using these pictures.
Speaking of which, thanks to Richard Byrne for teaching me this tip:
https://www.freetech4teachers.com/2023/05/the-effects-of-talking-to-yourself.html
For an explanation of what Creative Commons means, watch this video: