If your computer currently has 17 different windows open and you’re playing a game of “Where did I put that document?”, this tip is for you (yes, that’s me too). I just discovered this icon on my computer and I had to share!
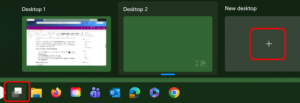
- Click the Task View button on your taskbar (the icon beside Search ), or press Windows + Tab.
- Click + New Desktop at the bottom of the screen.
- Open different apps and windows on each desktop.
- Switch between desktops by pressing Windows + Ctrl + Left Arrow or Windows + Ctrl + Right Arrow or click on the Task View button again and select the Desktop you would like to work in.
Instead of minimizing and reopening windows all day, you simply switch desktops.
✨ Once you start using Virtual Desktops, you’ll wonder how you ever managed with just one. Just be careful that you don’t think that you lost what you were working on and start again (yes-I did that one).
If you have any trouble with this, you have a tech tip that you would like to share, or you would like support with technology, please email us.
National Accessibility Week
In honour of National Accessibility Week, we’re highlighting something many people don’t realize:
iPads, iPhones, and Windows devices all include powerful accessibility tools built right into the operating system.
These features can support a wide range of needs—without requiring additional apps or expensive programs.
What’s Available?
Built-in tools can help with reading, writing, vision, hearing, and focus.
Some popular features include:
- Voice to Text (Dictation) – Speak instead of type
- High Contrast & Display Settings – Improve visibility and reduce strain
- Text Size & Formatting – Customize how text appears
- Screen Readers – Have content read aloud
- Assistive Touch & Input Supports – Make navigation easier
These tools can be easily customized directly on your device.
Quick Guides
Explore our Learn 71 quick-reference guides to learn more:
Apple (iPad & iPhone)
- iPad Accessibility Features (iOS 18)
- iPad Accessibility Features (iOS 26)
Windows
- Windows 10 Accessibility Features
- NEW: Learn71 Windows 11 Accessibility Quick Guide – Coming soon!
- Windows 11 Accessibility Features (Microsoft)
Accessibility is about ensuring everyone can access and engage with technology in ways that work for them. These built-in tools are a great place to start—simple, effective, and already available.
Summary of Learning Resources
- Elementary Summary of Learning with Comments
- Elementary Summary of Learning without Comments
- Grade 8-9 Summary of Learning
- Grade 10-12 Summary of Learning
For full MyEducation BC Resources – Learn71 visit the Learn71.ca resource page.
If you have any trouble with this, you have a tech tip that you would like to share, or you would like support with technology, please email us.
Luckily, Outlook has a few simple tools that can make a huge difference without creating complicated folders or systems.
🎨 Use Categories to Organize Visually
Categories let you add colour labels to emails so you can quickly spot important messages.
You could create categories like:
- 🔵 Staff
- 🟢 Parents
- 🟣 Tech Tips 😉
- 🟠 Urgent
- 🟡 To Read Later
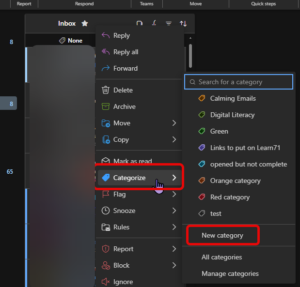
👉 Right-click an email → Categorize → choose a colour or click on New category and set one up.
🚩 Flag Emails You Need to Return To
Instead of leaving emails unread forever, try using Flags.
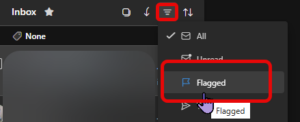
Click the little 🚩 beside an email to mark it as something you need to follow up on later.
This works great for:
- emails you don’t want to forget to read later
- people to reply to
- tasks you can’t do immediately