
Self Regulation – Visual Supports
If you require more information about using visuals to support your students’ self-regulation, please contact Andrea.Wilson@sd71.bc.ca, Kate.Sotkoway@sd71.bc.ca Occupational Therapists, or Andrea.Flesher@sd71.bc.ca or Catherine.Leppanen@sd71.bc.ca Inclusion Support Teachers or Nicole.Leong@sd71.bc.ca District Inclusion Support Teachers or Tina.Williams@sd71.bc.ca Behaviour Intervention Support Worker – or your school Counsellor or LST
There are are 2, sometimes 3, file types to choose from
- PDF (.pdf)– cannot be edited
- Boardmaker (.bm2) – can be edited, but you need to have access to the Boardmaker program to view or edit
- Word (.docx) – can be edited
Rationales
I feel…I can…
| Thumbnail | Description / How to Use |
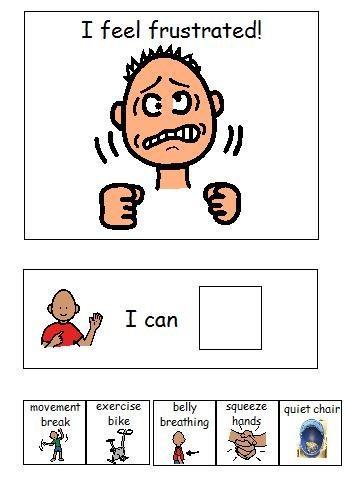 |
Use this visual support with students to identify the way they are feeling and then to select a choice that will help them calm down, focus or get back on task. I can choices can be selected from the all self regulation choices or they can be customized. Select from the 4 common feelings listed, or select the blank option to add your own picture/ photo and emotion. – I feel frustrated! |
 |
– I feel worried
– I feel upset
– I feel energetic
|
 |
– I feel (generic)
– I feel (with picture)
ALL SELF REGULATION CHOICES
– I can……….. (choices),
Select self-regulation tools (#8) or create customized tool pictures for individual students. |
| Thumbnail | Description / How to Use |
 |
– I feel frustrated! (with student’s photo) – I feel worried (with student’s photo) – I feel upset (with student’s photo) – I feel energetic (with student’s photo) – I can…….. (choices) 5×6Role play with student and take a picture of the emotion. Select self-regulation tools (#8) or create customized tool pictures for individual students. |
| Thumbnail | Description / How to Use |
 |
– Why am I upset? – What will help? (Fold and glue) 8×5Customize based on student’s triggers and personal self-regulation tools (#8). |
Calm Down Routines
| Thumbnail | Description / How to use |
  |
Another option can be using Safe Body Visuals. Link to TPT Safe Body Visuals & Simple Social Narrative
5 & 3 Step 4&6 Step (with Rewind and Try Again) This routine is used to help students calm down across environments. |
Break and Breathing Options
Body Break Activities Apr 2024
Body_Break_Activities_Symbols Apr_2024
| Thumbnail | Description / How to use |
 |
Quiet Cube Rules and Trampoline Rules 8×11 rules for using the Quiet Cube and Trampoline |

| Thumbnail | Description / How to use |
 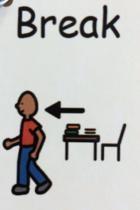  |
Break Card (fold and glue back to back) 6×4Depending on student’s ability to make choices, use either predetermined activities (left example,) or select self-regulation tools (#8) or create customized tool pictures for individual students (right example). Break Pic |
Break Card
Break Pic
| Thumbnail | Description / How to use |
 |
I’m OK Not OK fold and glue back to back 4×3Used to help a student gain awareness of whether they need a break.  |
| Thumbnail | Description / How to use |
|
|
All Self-Regulation Tools 1×1 2×2 4×4 Review tool options and decide which are best suited to your student. Tools that provide physical activity, belly breathing, quality time with a trusted adult, and creative expression (e.g., drawing, colouring, building, etc.,) will alleviate stress. Some tools can be used anywhere and any time. Other tools will require your student to leave the classroom. |
| Thumbnail | Description / How to use |
 |
Breathing Choices 1×1 2×2 4×4 8 x 10 Belly breathing is a tool for the body that promotes activation of the calming response (via the parasympathetic nervous system.) Practice belly breathing with both hands over the navel to be sure the diaphragm is moving with each breath. The belly should expand with each inhalation and collapse with each exhalation. |
| Thumbnail | Description / How to use |
 |
“Anytime” Classroom Self Regulation Tools (for whole class) 4×4 Display these at the front of the class or on a student’s desk after explaining and practicing each activity. Use them to prompt students to engage in independent self-regulation activities. |
| Thumbnail | Description / How to use |
 |
Desk Break Strip (for student) 1×7Tape this strip to each student’s desk to provide a visual reminder of self-regulatory body tools that can be used while working. |
| Thumbnail | Description / How to use |
 |
Thinking Tools 2×2 4×4 Use this visual to remind your student of some thinking tools they can use for self-regulation. Thinking tools are proactive, supporting a students self regulation before they become upset. Be sure to explicitly teach and practice each strategy when a student is happy, relaxed, and engaged. |
| Thumbnail | Description / How to use |
 |
Size of Problem 8×10To teach/implement size of the problem (a mind tool), refer to Zones of Regulation Curriulum pages 122-126. |
3 and 5 Point Scale and Zones
| Thumbnail | Description / How to use |
 |
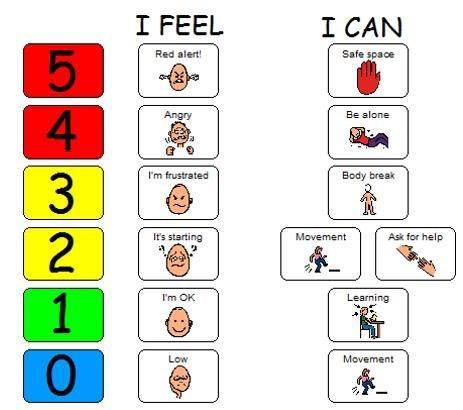
0-5 Scale 2×7This scale a tool for the mind. Use this 0-5 scale with a student who struggles to identify/manage frustration/anger. First, discuss what each level feels/looks like (for that student). Then, use the scale as a visual prompt to identify what level the student is at (focusing on levels 0-2 to begin.) Please be aware that this tool may not be effective if the student is at level 4 or 5 (because thinking abilities decline during extreme stress). |
| Thumbnail | Description / How to use |
 |
ZONES Tools Level 1 & 2 I Feel I Can I FeelUse this visual support with the Zones of Regulation program. Select from All Self-Regulation Tools (#8) for the I Can column, or draw/list regulation tools with a wipe-off marker. |
| Thumbnail | Description / How to use |
 |
3 Point Scale with ZONES colours Looks like, Feels like, I can try to 8×10Use this 3-point scale to help your students understand their usual patterns of nervous system arousal (i.e. elevation). First, work with your students to determine the external and internal signs of their elevation. Record these in the looks like and feels like columns. Then, decide on some tools that could be helpful at each stage and record these in the I can try to column. Tools at level 1 will help your students stay calm and ready to learn. At level 2, include tools for the body (i.e. sensory), heart, and mind. Be sure that several tools can be used anywhere and any time. At level 3, your student may simply go to a “safe space” to de-escalate. Mind tools will not be effective at this level. |
| Thumbnail | Description / How to use |
 |
5 Point Scale Looks like, Feels like, I can try to fillable 8×10 Use this 5-point scale to help your students understand their usual patterns of nervous system arousal (i.e. elevation). First, work with your students to determine the external and internal signs of their elevation. Record these in the looks like and feels like columns. Then, decide on some tools that could be helpful at each stage and record/illustrate these in the I can try to column. Tools at level 1 will help your students stay calm and ready to learn. Beginning at level 2, choose tools for the body (i.e. sensory), heart, and mind that will help your students return to a calm and alert state (i.e. level 1). Be sure to choose some tools can be used anywhere and any time. Tools for the mind will not be effective above level 3. At level 5, your student may simply go to a “safe space” to de-escalate.
|
| Thumbnail | Description / How to use |
 |
5-Point Scale with ZONES colours I feel I can Visual 8×8Use this 5-point scale mind tool to help your student understand his/her usual pattern of nervous system arousal (i.e. elevation) and follow through with self-regulation tools. Customize the feeling pictures in the I Feel column to represent what happens for your student. Similarly, customize the I Can pictures with self-regulation tools that your student responds to at each level. Email the Student Services Technology Department for support with customization. |
| Thumbnail | Description / How to use |
 |
Where am I? ZONES check in for desk 2×4Customize this Zones of Regulation visual with your student’s most frequent blue, green, yellow, and red zone feelings by printing I Feel Images (#22) or emailing a request to the Student Services Techology Department. |
| Thumbnail | Description / How to use |
 |
Graduated ZONES Supports from 1 to 2 to 3 to 4 ZonesUse these simplified Zones of Regulation visuals to teach your students to identify their zones and choose/use effective self-regulation tools. These visuals were designed for students who are just beginning to identify feelings. First, introduce only the green zone with ‘happy’ in the I feel column. Choose one or two tools for the I can column that help your student stay in the green zone. Once your student is able to identify when they’re happy and use their green zone tool(s), introduce the blue zone with ‘sad’ as the feeling (using the green/blue visual). Once your student is able to identify and differentiate happy/sad and use effective coping tools for these two zones, introduce the yellow zone, choosing whichever yellow zone feeling occurs most frequently for your student. Introduce the red zone in the same way. For I feel visuals, choose from I Feel Images (#22). |
| Thumbnail | Description / How to use |
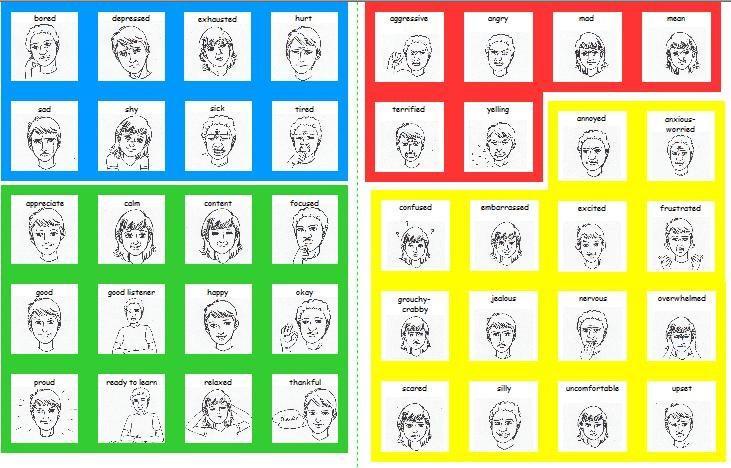 |
I Feel Images for Graduated ZONES Supports 1.5×1.5 (sized to fit with Graduated ZONES Supports) |
| Thumbnail | Description / How to use |
 |
Self-Regulation Choice (I can) Key Rings 3×5 file makes 6 NOTE: Print ‘Change’ page on transparency sheet.This key ring can help students identify their zones and choose tools for self-regualtion. Please note that ‘move’ and ‘relax’ tools are all tools for the body. Also, there are no heart tools included in this visual support. |
| Thumbnail | Description / How to use |
  |
3 & 5 Count Down Token Strips Disney
1×1
2×2
|
| Thumbnail | Description / How to use |
  |
3 & 5 Count Down Token Strips Stars
1×1
2×2
|
| Thumbnail | Description / How to use |
  |
3 & 5 Count Down Token Strips Sesame Street
1×1
2×2
|
| Thumbnail | Description / How to use |
  |
3 & 5 Count Down Token Strips Star Wars
1×1
2×2
|
| Thumbnail | Description / How to use |
 |
Months, Days, Dates, Years 3×8, 3×5,3×3,3×4 combination |
Consequence Map and Contingency Map
| Thumbnail | Description / How to use |
  |
– Consequence Map (horizontal)
– Contingency Map (vertical)
|